DYSU # 78 : Blue Skies and Clouds

>> Thursday, June 28, 2012

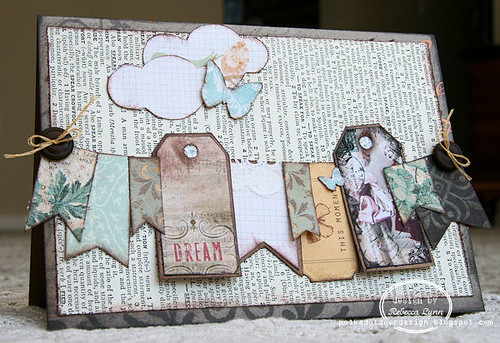
Needless to say, at the announcement of this challenge I was very excited! I'm not sure if any one else has noticed recently, but I've had a things for clouds recently (here & here) and so to have a challenge dedicated specifically to those adorable little paper embellishments that I've been enjoying recently (thanks fiskars!) really wasn't that much of a challenge. I'm so glad we had some sponsor images to work with this week, because otherwise I'm not sure where I would have started (or stopped for that matter) with all the ideas that were floating around in my head.

SUPPLIES
Gecko Galz "Tag You're It" Tags
Recollections Paper
My Minds Eye Paper
Prima Paper
Vintage Dictionary Sheets, buttons and floss

There are three fantastic sponsor this week at the DYSU blog, and I had the privilege to work with some digital scrapbooking tags from Gecko Galz. They are offering a the complete July collection (valued at $30) to one lucky winner. This is one of those moments I almost wish I wasn't on the DT team so I could be eligible for the prize. I've never worked with digital scrapbooking stuff before (besides stamps of course) and I had a blast!

Be sure to check out the Do You Stack Up Blog to see what the rest of the design team has come up with and for a peak at our other sponsors.


Read more...

Catered Crop : Colour Me a Rainbow {Rebecca}

>> Wednesday, June 27, 2012

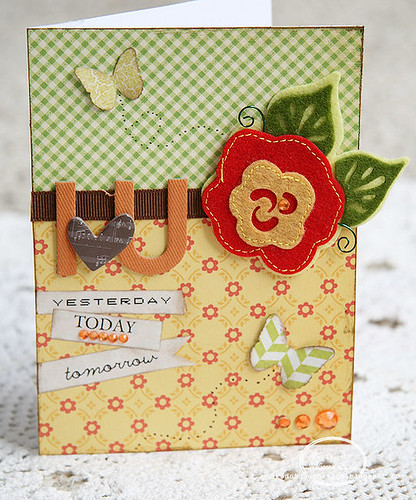
Yes its me again, with clouds, and banners, and I managed to squeeze on a butterfly too. I'm becoming a little predictable I think. But then again, its really quite difficult not to be when there are just certain elements that I love! Usually the people I give my cards to haven't been looking at the blog, so they have no idea that about 75% of my other cards look pretty much the same.
Ok, maybe this one is a little bit different. They all are just a tad because I have to tweak them somewhat to play along with my favourite challenges. This weeks challenge isn't just another challenge, its my first post officially as a "Top Chef" at Catered Crop. Its rather a yummy design team position that I'm thrilled to be a part of. Challenges run for two weeks, so you have lots of time to play, just tell them Rebecca sent you :)

SUPPLIES
My Minds Eye Button and Ribbon
Prima Ribbon
Misc Ribbon and floss

The ribbons look a little wet, and they are, but not with water. I dabbed the ends with a little bit of clear nail polish so they wouldn't fray. However, in my eagerness to finish the card, take a picture, and blog about it all before the husband got home, I didn't quite allow it time to dry. Oops :)

Thanks for stopping in.

Read more...

Catered Crop: Color Me A Rainbow {Sarah}

>> Monday, June 25, 2012


This week I am so excited to be joining the lovely ladies (including my own sister, Rebecca) over at the Catered Crop as a member of the design team!  I cannot even begin to tell you how much of an honor it is to have been asked to join such a talented group of crafters.


This week's recipe swap is "Color Me A Rainbow" and it gave me the perfect excuse to break into some of the October Afternoon "Fly a Kite" collection that I have been hoarding.  I have a special affection for this collection because it is the line that started my obsession with OA products.  I really like the cheerful color scheme and the whimsical designs.  

  Supplies used: October Afternoon patterned paper, stickers and journal card, 
Jenni Bowlin vintage buttons, American Crafts thickers, ribbon and cardstock.

I am not sure if my design quite lives up the expectations I had for this paper, but in the end I am really happy with this layout for a completely different reason.  While I was working on it, I jokingly asked my husband if he would do the journaling for me. To my compete surprise, he said "yes".  Since the photos are of our kids with their great-grandmother on his side, I think it is special to have their daddy's perspective on the day. 


Read more...

Scrappin Patch : (Prima) You've been Promoted!

>> Saturday, June 23, 2012

Another project for Scrappin Patch to share with you today!

For this father's day, my husband informed me rather suddenly that he had every intention of celebrating it. I of course was more than happy to comply as I love any excuse to celebrate! Our little one is not due until August, but just because it is a little shy doesn't mean that we cannot enjoy being parents already ... I had a little trouble knowing what to put on the card, but once I got past that, this card just came together and my husband loved it.

SUPPLIES
Prima : Paper and cardstock
Vintage buttons
Cosmo Cricket : Type font

More great Prima product to work with, though I choose a much simpler card this time. That seems to be a trend in this household. The cards I make for girls tend to get very "product heavy", while my masculine cards are much more CAS. How do you do it?

Thanks for looking! 

Read more...

DYSU 77 : Movie Inspiration

>> Wednesday, June 20, 2012

Forgive the short-ish postings recently. We're in the middle of moving, I'm sure most of you can understand when I say things are rather busy at the moment! 

Have you ever seen the movie "Leap Year" with Amy Adams? Its one of my absolute favorites! As soon as I saw the theme for our weekly challenge at Do You Stack Up I knew I was going to use this movie as my starting place. I used this adorable stamp from Tiddly Inks, one of our sponsors for the week. Isn't she sweet?


I had so much fun with this weeks challenge and you will too, especially when I tell you there are some pretty neat prizes to be won.

Tiddly Inks is giving away a $12 gift certificate to their online shop and there is also a $20 gift certificate to Alley Way Stamps up for grabs.

Not to mention the always impressive bragging rights to those who earn one of our Top 3 spots, or the guest design position. Hurry on over!

Challenges :

Reasonable Ribbon : White and Blue 
Case Study : Challenge # 96

Read more...

A Father's Day Card

>> Friday, June 15, 2012

I really like making cards, but for some strange reason I always forget to make cards for specific occasions.  I have a basket full of cards that I made for no specific person or event, but when it comes to holidays and birthdays, I always forget that I need a card until the very last moment.  And of course, no matter what the occasion, it will be the one theme that I don't have in my collection of pre-made cards.

This year though, I was organized - so organized in fact that the card I made for my father-in-law was mailed in time to actually get to him before Father's Day (not organized enough to remember to take a picture of it though...)

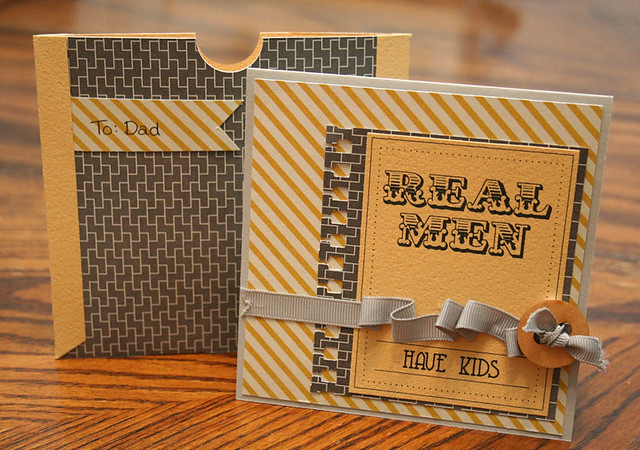
This is the card that I made for my Dad.  You will notice that I am still on my grey/yellow kick.  All of the papers are from the American Crafts Chaps line and the sentiment was based upon a  cute printable I saw on Pinterest.


I have come to the conclusion that I like to make square cards. I don't know why, maybe it satisfies some OCD tendency that requires everything to be even.  At any rate, the problem with square cards is that it is difficult to find ready-made envelopes to fit them, and I am lazy don't particularly like fiddling with making my own, so I've taken to making "sleeves" for my cards. And if they have to be mailed, I just seal up the top in the same way I seal up the sides (Washi tape works well!)


Read more...

DYSU 76 : Masculine

>> Thursday, June 14, 2012

I am so excited to be posting my very first project for Do You Stack Up?, my newest design team position and one I've long thought would be an incredibly fun one to be a part of. I've been playing along off and on since the site started, so to be chosen to work along side these fantastic ladies is such a privilege.

For our first challenge (but #76 for the DYSU site!) we were to create a masculine card. Here's my take :

SUPPLIES
My Minds Eye Paper, Brads, Stickers
Musc Ribbon and Paper

Its a bit of a fun from this card I posted a few weeks ago. I had wanted to try this card with a bit more of a masculine twist anyways, so this was the perfect opportunity.

You have a full week to create a project based on the inspiration, can't wait to see what you create! There are lots of opportunities to win some fantastic prizes from our sponsors and/or earn a top 3 spot where you can join us as a guest designer.

Challenges : 


Read more...

Scrappin Patch : Origami Dress Tutorial

 
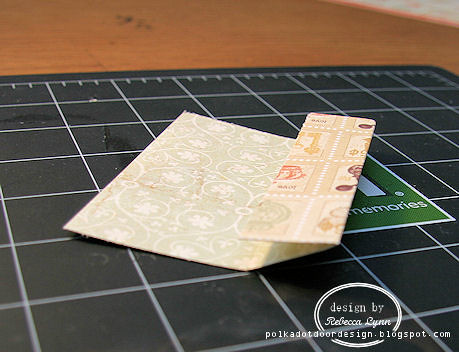
A few months ago I saw an adorable little card with a handmade dress embellishment and decided then and there, I was going to master the skill. It took a little bit of searching since I had never attempted origami before and had no idea where to begin, but I finally found a a youtube tutorial that helped me through the process and help me create something that has become one of my favourite little tricks that I've picked up. I've attached the youtube link to this post as well, just in case my photo tutorial and instructions are a little hard to follow. It took me a few tries to get it just right.

My most recent Scrappin Patch kit came full of yummy Prima Songbird papers and they were just the right texture and pattern for this little dress. You don't want to use a really heavy paper because it doesn't fold easily, but you also don't want to use a lightweight paper as it will tear! Some medium is perfect.


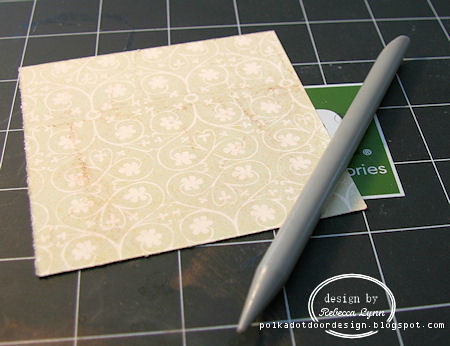
The only tool you (may) need is something to press the folds and help get them nice and sharp. But fingers work well too! You want a square piece of paper approx. 1/2 inch larger than the finished size you want to end up with. In this case, I am using a 3.5 x 3.5 inch square.


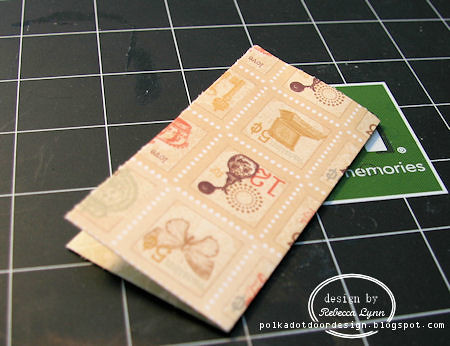
Fold your paper in half. Crease this line well.


Then unfold your paper, and fold the edge to the center crease.Repeat with the opposite side.


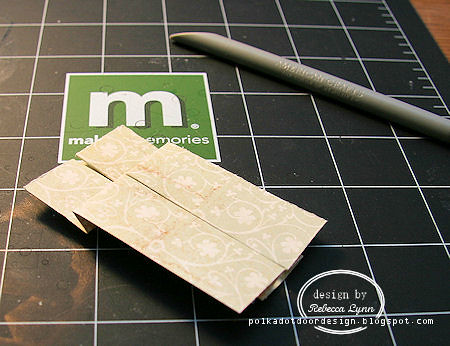
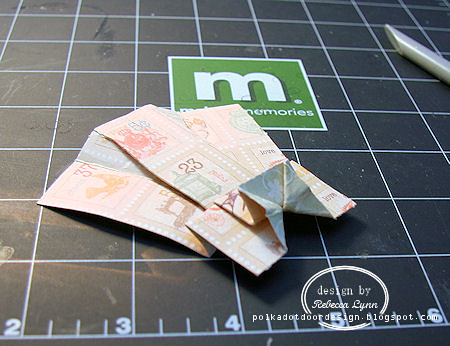
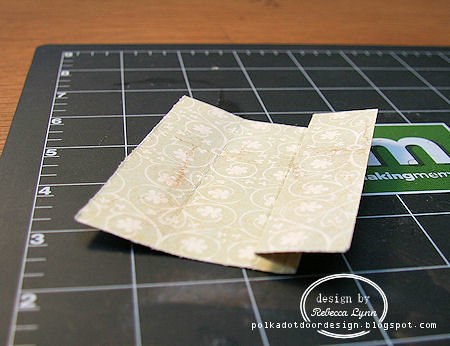
Unfold your paper again and fold half of your halves, in half again. Its a bit complicated to explain, but hopefully you can see what I mean in the photo. Repeat. The end result is that you want it to look like this :


Be sure to crease these folds well. This is the basis of your dress form and the sharper the lines are, the better.


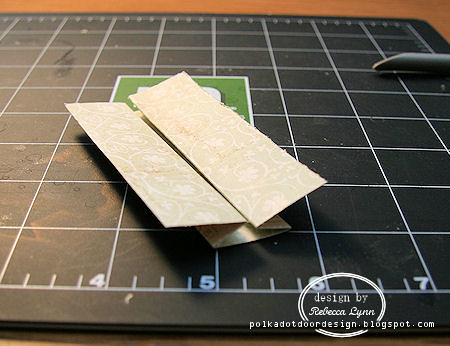
Now turn your paper over and fold it at about the 1/3 line. This fold is very customisable, as it creates the separation between the skirt and the bodice of the dress. Depending on the style of dress you want to create, you may want to change the length of this fold. 


Fold it once over itself so that your paper now looks like this. 


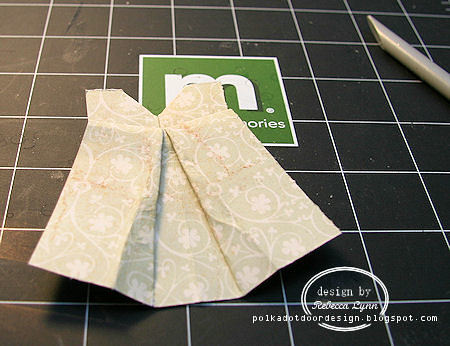
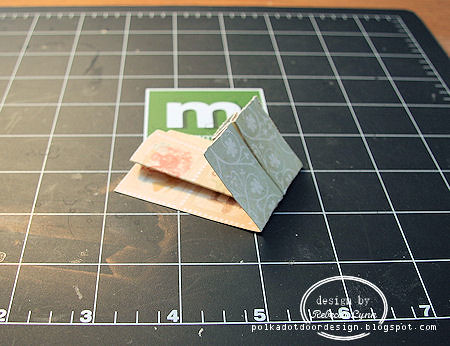
To create the full dress, you want to gently pull one section of the skirt so that you are opening up the part from the bottom up. The waistline will no longer be straight across, but a slight "v" once both sides of the skirt are pulled open. Crease these lines sharply. 


We're now creating the neckline. Bring the corners of the topmost layer of the paper and fold inwards.


This is probably the trickiest part of the dress... Unfold your neckline, turn the dress over and pull the corners inside, pulling down the excess paper as you go so that there is a full "v".


This is how the front should look.


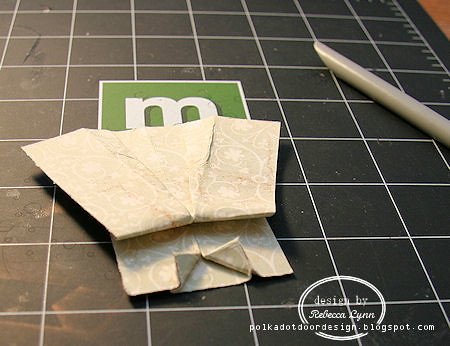
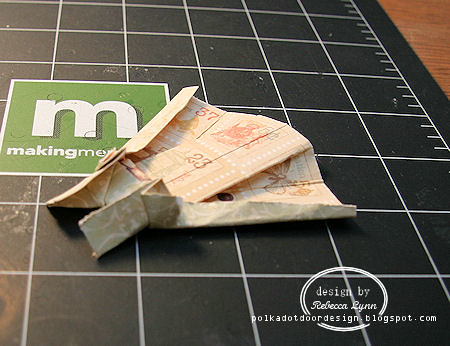
Again on the backside of the bodice, fold the sides of the bodice in, you may have to crease the skirt a bit to help everything line up as well. Then take the corners of your turned in sides and fold them out again, creating the sleeves.


and thats it, you're done! Hope you were able to understand my instructions! The youtube video is an excellant resource if you get stuck.


I just love how easy this dress is once you get the hang of it. You may need to practice on scrap paper before you attempt working with your nice paper, but its such a fun little dress, and perfect for so many applications. Now that I know how, I have to tell myself not every card needs a dress. Little boys really are more into trucks and puppy dogs ....

Thanks for stopping in!

Read more...

Oh Right, This is My Blog Too!

>> Tuesday, June 12, 2012

I got so caught up in admiring all of my sister's gorgeous (and frequent) projects that I forgot to post any of my own!

Earlier this year I made the decision to take a bit of a break from being on any design teams or having any commitments in regards to crafting so that I could focus on other areas of my life.  It has been interesting because I am definitely a procrastinator and work best under pressure. Last year when I was on the Apron Strings design team, I frequently didn't receive my kits until a day or two before my projects were due.  And yet I usually managed to meet the deadline, often cranking out 6 or 8 pages in less than 48 hours (and occasionally even being happy with the results!)

It is completely different now.  Since I don't have any deadlines I am challenging myself to be a bit more thoughtful in my layouts, focusing more on capturing the stories of our life, including more journaling and trying out some new techniques.  It isn't uncommon for a layout to stay spread out on my workspace for a few days...which, given that my current workspace is the kitchen table means that my kids are having a lot of "picnics"!

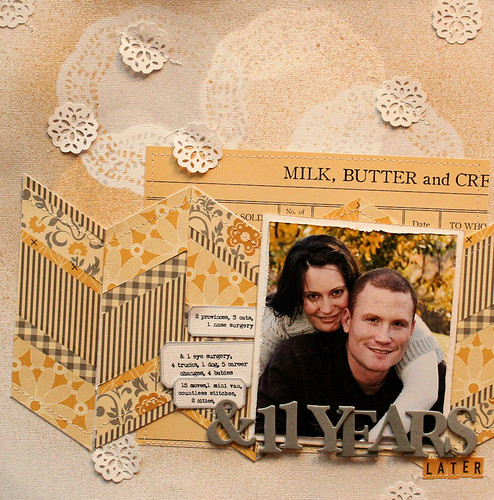
For the layout I am going to show you today, I tried my hand at a paper pieced chevron - something I have seen popping up all over the place on Pinterest.  I also did some misting, which is something I have just started to incorporate into my layouts.  I *swore* that I was not going to get into misting, but then October Afternoon started making mists and my resolve wore down because I am pretty much on a mission to acquire every.single.product they have every made. 


I am pretty happy with how this one came together.  Aside from the fact that it is a relatively decent rare photo of my husband and I together, I am also kind of enamored with the grey and yellow color scheme.  If we weren't renting at the moment I think I would be in the midst of redecorating my whole house in these tones!


Read more...
Something to Share

>> Monday, June 11, 2012

I have two projects to share with you today! We just found out that we take possession of our new home on the 26th of this month so that leaves me with little over two weeks to wrap things up and be ready to go. I am so excited, our new place is a little bit of a dream come true for my husband and I (though some people might look at the fixer-upper we're buying and think we're crazy!). I am so looking forward to having our own place. The rental that we've been in for the past year has been great, but you really are limited to what you can do when its not your own space. All that being said .... with such short notice I decided I better clear up some of my DT commitments, birthday cards that needed making, and spare photos the past few days. You may see a few blog posts coming up shortly, but I'm not actually creating anymore after today. Thats just my lovely pre-scheduled option with the blog. It makes me look so much more efficient than I really am. After today, I'll be running around trying to pack and organize everything and my scrapbooking stuff will be shut away. Who knows when it will see the light of day again? :)

My first project is a birthday card I made using 100% MME products just because :) I've been stashing these bunting chipboard's for since last year and thought it was high time I used them up. I just love the way this card turned out. Its perfect for a certain little girly whose birthday is coming up soon. I knew I needed a "fun" card for this silly person and think it turned out exactly how I wanted it too.

Challenges :

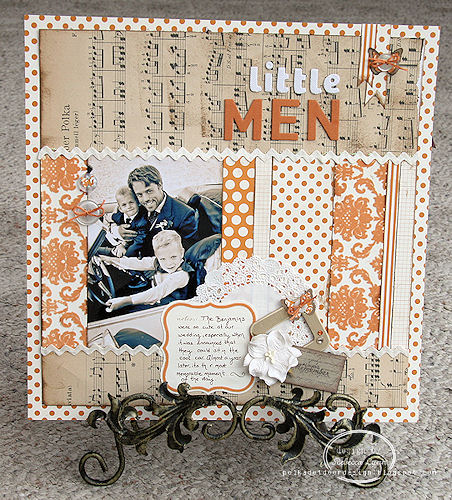
I've had this idea for this page wandering around the back of my mind for quite some time and after organizing my stash the other day in preparation for moving, I decided I'd better hurry and try to get it done! I never really thought of myself as an "orange person" but more and more I find I'm using this colour in combination with others, or just by itself. Apparently I'm a bit brighter of a person than even I knew!  wanted to play along with a new challenge site I found, "The Color Room" but didn't have any gold so am hoping the orange fits into the colour scheme instead. I absolutely love the insipration they used!

Challenges :

Hope your week is going well! We're settling in for some heavy rain this week which means its a good time to get everything organized. My husband works outside, so I know he doesn't appreciate all of this wet weather, I try not to be to thrilled that he gets to stay home most of the week because he's getting behind on his work! I figure its better to have me happy than the customers, right? :)

Read more...
Its a busy sort of a weekend ....

>> Friday, June 8, 2012

I have a to-do list when it comes to cards. A little funny perhaps, but with so many occasions constantly popping up I try to make my cards specifically for certain individuals, instead of just stock piling them (though I do that too!). If I don't keep a list of all the things coming up, I tend to forget what I need. Somehow the fact that I needed a card for an upcoming Jack and Jill Party escaped me until this morning (the party is this weekend) so I decided I better get right on it. I turned to some of my favourite challenge sites for inspiration and decided to try and keep it CAS, something I'm not the best at, but do enjoy the results. Over at CAS-ual Friday's its all about Polkadots! And seeing as I love polkadots, its was the perfect challenge to play along with.

SUPPLIES
October Afternoon Paper
Antique Buttons, floss, ribbon
Martha Stewart Ink

Challenges: 

Now its off to clean the rest of the house and get ready for a busy weekend! Coming from a big family to just my husband and I, I had this funny little idea that life would actually be a little less busy. Doesn't seem to work that way though! There is far more on my plate these days than there ever was when I was single, and its only going to get crazier!

 My kittens are experts at taking it easy. Maybe I should follow their examples one of these days?

Ah well, such is life.

and I positively love it :)

Read more...
Scrappin Patch : Welcome Baby!

>> Monday, June 4, 2012


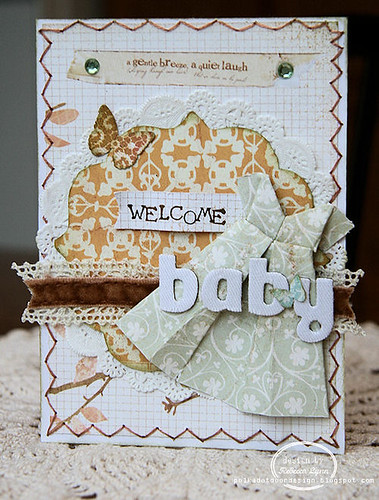
Knowing that I also had a technique post coming up shortly (June 14th!) I decide to make a card for Scrappin Patch using a technique that I am planning to highlight in my next post, adorable Origami dresses!! These are so much fun to make, and the Prima Songbird paper line was the absolute perfect match for the ideas that I had in my head.


SUPPLIES
Prima : Paper and embellishments
American Crafts : Thickers
Recollections :  Alpha stamps

I handstiched the paper to the card and accented the background with a few rhinestones. I then added the doillie and more Prima paper before accenting it with the ribbon, text, butterflies, and dress. I had so much fun working with the Prima product and there was more I wanted to add, but some of it will have to wait until my next post. They have some fabulous product that you'll have to visit the Scrappin Patch store to look up.

Challenges :


Thanks for looking!

Read more...
Catered Crop : Guest DT

I cannot tell you how thrilled I was to receive an email from Linda asking me to join the incredible team over at Catered Crop for this weeks newest challenge : Felt from the Heart, as a guest designer! Catered Crop is a blog I recently discovered but have fallen in love with their challenges and the fabulous inspiration that you can always find.
While felt is not an element I use very often, I was excited for the push to use it. So in every way, the challenge was just that. But when I paired the K & Co. feltie with Cosmo Cricket paper, it turned out so fun, almost retro even!

 SUPPLIES
Cosmo Cricket Paper
K & Co Feltie
American Crafts Thickers
My Minds Eye Lush Rhinestones
Prima Ribbon

Be sure to check out the Catered Crop blog this week. You have until the 9th of June to link up and be eligible to win 30, 6x9 sheets of wool felt to make loads of custom felt embellishments with!

Challenges 

Read more...